25 June 2014

Cuff, cuff, cuff...links

Mr Stitch'n Knit acquired double-cuffed shirts which require cufflinks. Pronto presto, a pair of branded cufflinks to look extra professional with clients. 


You'll need a pair of blanks cufflinks cabochons with matching glass domes and a picture.
First glue the domes onto what you'd like to show with PVA glue.
Then once it is dry, cut around the domes with either scissors if they're square or a craft knife for odd shapes.
Finally glue the dome onto the cufflinks.
Ta daaaaa

The logo represents Flybrid Automotive. If you want to know more about Kinetic Energy Recovery Systems, in everyday talk, have a read of Top Gear's article


12 May 2014

Stencils for little ones

We'll be welcoming a new family member this summer. I though the parents to be might need a little help and a giggle. 
These are 3 bodies with stenciled writings. 


One might need a reminder of which way is up during ungodly hours.


That is for the giggle part.


Yes, there is on "Out" at the back, much lower down.


20 April 2014

Bloomers - take 2 with flowers

And there was a take 2 on bloomers using the Colette pattern !
This time with a light (ahem) flowery 100% cotton.

The fit was altered as well with a waist 4cm lower. Well...This is still not perfect, I'll need to raise the back by 2 cm and leave the front like that. 


The bloomers were packaged nicely and sent as a birthday present. Actually, the bloomers made their own way in the lingerie bag.  


10 March 2014

Does my bottom look big in these? Colette Madeleine Bloomers

I temporarily gave up on corduroy trousers. I was chuffed with the material, I increased the crotch allowance and I even added pockets. It all seemed to work so well. Then I stalled on the zip. They're a faff to stitch. And since, I haven't really touched them.

Once upon a while I would have finished the damn project without allowing me to start a new one.
You know what? In the era of instant gratification and reduced attention span, I jumped to another project. Life is just too short.

I perused some time ago the Colette website, which has lovely patterns. A few of them are also free, including the Madeleine Bloomers. Kelly had already made hers, and they look adorable, albeit very low-waisted.

My derrière is fuller than Kelly's (not that I looked hers up, ahem) and I thought measuring well beforehand and making a toile would avoid any mishap. The measurement taught me there was a good 10cm/4 "difference between my ideal crotch length and the pattern. The toile taught me my modesty wouldn't be protected when bending over if I were to follow the original pattern.

So I went for it and added 8cm/3 1/4" to the belt.


Now, now, I didn't use any old scrap paper I had to heighten the belt. If you look closely you can see stock prices. Ahhh, good old Financial Time. Maybe the only broadsheet to use a salmon paper.


The result is cute. The fabric is a black lightweight cotton with little white flowers. I had fun with the bows.
I didn't follow the pattern with regards to the button holes on the legs. Once I threaded the elastic, I made a box split and stitched the bows on it.


The elastic bit is the most tedious part. They are 4 rows of it and between stitching the rows, one has to ensure the opening are still there (oops) and then thread it. It took longer than I wished for. Plus this fabric is really dark so spotting the openings was tricky. I initially put pins but they fell off.

I burnt the edges of the loose strands of the nots to stop fraying. And I used a chopstick to use as a stand and make the nots on before stitching them by hand. I made all three at the same time to make them the same size.

The only thing I'd like to say is that adding the surplus for the waist means that, whilst my modesty is protected, it is not the most flattering for my behind. Maybe I should have tried the size below and only added 6 cm to the waist height.

You know what this means? There needs to be a take 2!

3 March 2014

Mulher Gata Bracelet and Earring set

An amazing friend turned 40, 2 years ago now...Time flies.

The friend is a gorgeous and bubbly person with wonderful friends. Her birthday party was amazing, her closest friends remade the Madonna's video Hung Up, with leotards and all. It was hilarious.

The bracelet and earrings are made of fresh water pearls, sterling silver beads and finding as well as turquoise beads I purchased during a trip to South America.

The bracelet is made of sterling silver chain with beads. I've fitted a big lobster clasp as there is nothing more annoying than fighting to close a bracelet.

The earrings are finished with a little twisted "squiggle" instead of using a ball head pin. I guess either I didn't have sterling silver ones, or I must have run out.


Where do you get your crafty supplies? I'm all ears.

26 February 2014

It that a blue cucumber in your shoes, or are you happy to see me? (Tutorial)

Have you ever had a pair of sport shoes you loved so much, but was also smelly?

Well, if you're a runner, climber, rower...it is likely you wear the same pair of shoes over and over again. Sure, you can chuck them in the washing machine, however it won't take long before they start smelling again. And their life span might be greatly shortened.

I'm a climber and my comfy(-er) pair of shoes have a very unique smell... It seems only to my standard though.
Yes, we had a sniff test with other climbers and I'm happy to say mine are at the bottom of the smelly ladder. Which to a climber only means one thing: I'm need to climb more!

I spotted a climber with bananas in his shoes. Honestly, bright yellow scented bananas.
What a brilliant idea! I immediately though about some particularly unsightly fabric I bought some time ago that I could use. I'm not quite sure what I was thinking that day.

The content of these shoes inserts is simple enough:
  • Bicarb Soda
  • Lavander
  • Tea Tree oil
All ingredients are easy to find. Wilkinsons seems to be the cheapest for bicarb soda. Just buy this one and not the cooking one.

You'll also need about 50x50cm of fabric to make the shoe inserts and the tape to pair them together.
They're a bit like gloves, if they're not tied together, one could go walkie.

Tutorial

The shoe inserts are made of 6 panels of fabric stitched together. They're united by a length of tape to stay together. They can also be clipped on a carabiner and kept with the rest of your equipment.
 
1. Measure the shoe length and diameter at its widest. Take a bit out for each measurement and divide the diameter by 6.  Draw a diamond shape on a bit of paper: Trace a long horizontal line (length), at its middle trace a smaller perpendicular line (diameter / 6). Join the points and draw flat endings. Your pattern is done!


2. Cut 12 pieces of material following the template. 6 per shoe. I folded my material multiple times to cut 6 pieces at a time. Accuracy is not paramount with this pattern.


3. Using the wrong side of the fabric, pin all the sides together.


Many, many pins.

4. Stitch all the sides together (6 pieces by 6 pieces).

5. Stitch close one end of the tube and turn inside out.

6. Cut a strip of fabric (4cm x 25 cm), fold the side length-way, then fold again in two. Iron flat, then stitch length-way.

7. Take a scrap of fabric (6cm x 6cm), soak it in Tea Tree oil and cut it in tiny bits

8. In a pot, mix together 200g of bicarb soda, 100g of lavender flowers, and the bits of soaked fabric.


9. Take a funnel and pour the mix until you fill 3/4 of the shoe.
 
10.  Insert the end of the tape, stitch the shoe insert closed.


Your first shoe insert is ready. Repeat the steps to make the second one.
If you have some mix left-over, you can use it up in scented bags.

Now it is your turn, let me know what oblong shapes and colours you come up with!

19 February 2014

Xmas pressies for 2013 - Jewellery

Since I had a little more time this year re-Christmas, I decided to make most of the 2013's Christmas presents.

I am always torn between using existing skills and being on the safe side or trying something new and exciting which could potentially turn bad. I also do not tend to leave myself enough time as creativity isn't always there when you need it. Maybe we should have loan-in muse for such times.

Do you plan you present well in advance, even if it means loosing the thrill of a timely present, or do you hope to find the perfect fit risking to rush or have to settle for an okay present?
If you're the former, then being late is not an issue.
If you're the latter, like me, adrenalin is your friend.

I started a bit of an industrial making of little lingerie bags. After tuning in an excel document to get the dimensions rights (did I mention I loooove Excel?) I made 4.
Fabric is key with this model and good quality cotton is delightful to work with, especially the interfacing bit. I'll create a post on this at a later date.

Today let's talk about...beads and jewellery.

In the midst of pressure and not many ideas, I set off to put together a few things most of the ladies awaiting a gift. These pieces had to be small and light enough to go by post. Once mad and posted, I would light up a small candle for the parcel to arrive and on time. And it did!

The first item is a sterling silver bracelet with pearls and beads purchased in South America. I used freshwater pearls, silver findings and tiger eyes with silver pieces to give the impression of fullness with clean lines.
The bracelet closes with a toggle clasp for ease of fastening and has a bigger fresh water pearl dangling to keep the bracelet facing the right way up. The weight of the dangling pearl positions the fastening facing down.


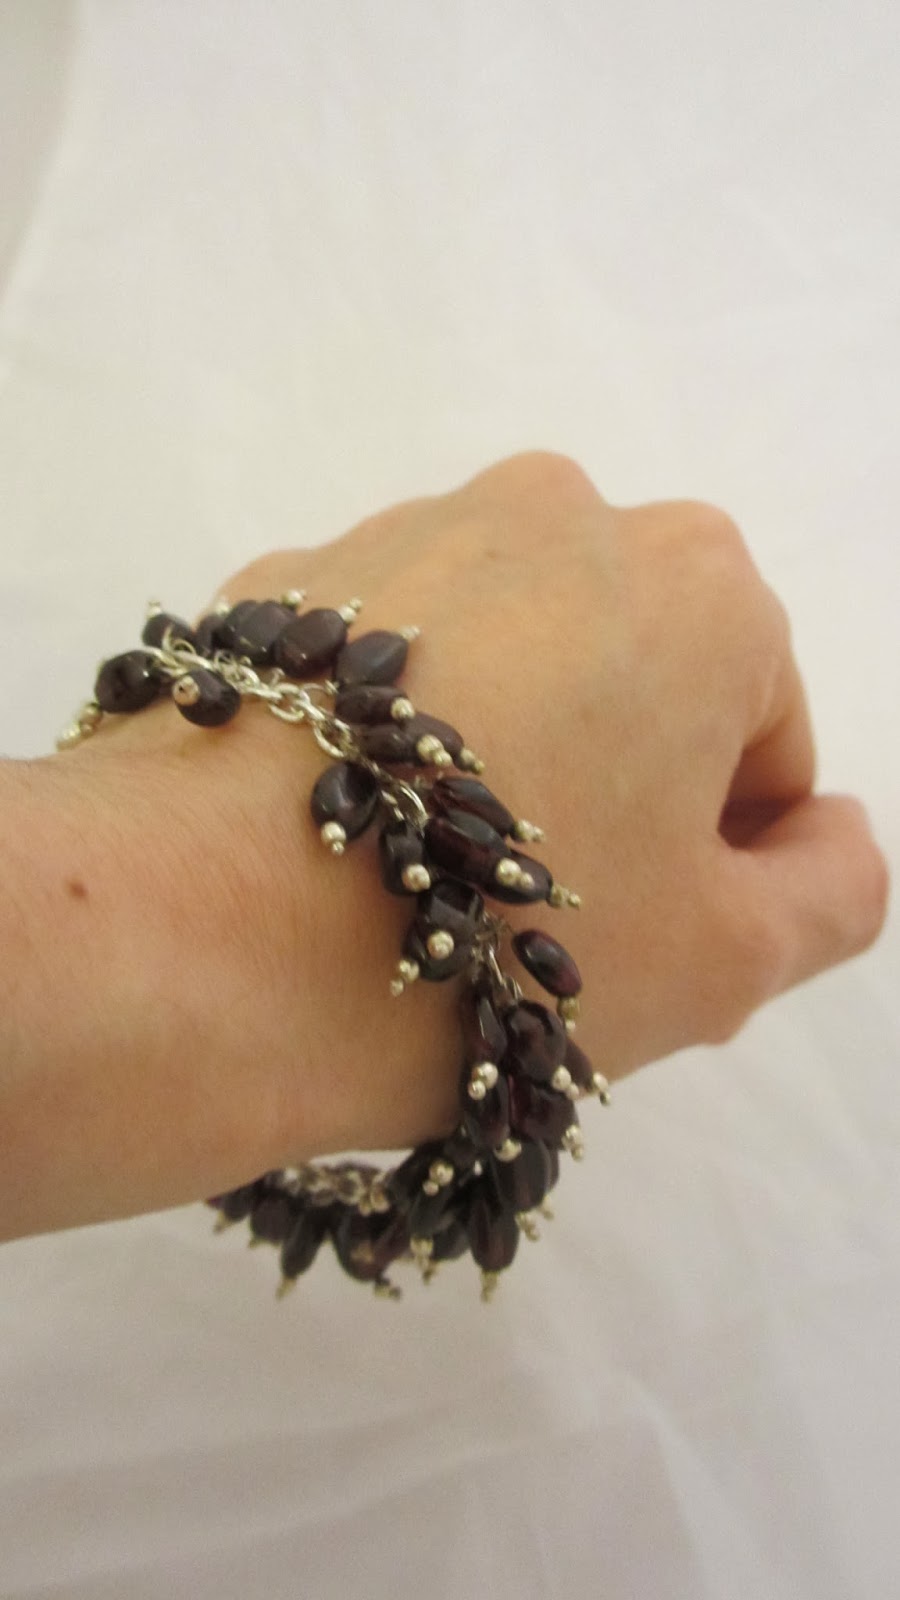
The second bracelet is made of many garnet pearls mounted on a silver plated chain. The fastening is a sterling silver toggle on this one too. I thought it would be much easier to fasten given the weight of the bracelet.
The garnet was initially mounted on a pair of earring a friend gave me with the instruction "I'm not wearing those anymore, do something nice with them". I'm glad they found a new lease of life.


For this present, I wanted to create a classic piece that this person could wear for a long time. I knew it wasn't the type of jewellery she was into right now, however the idea is that this would be a failsafe necklace for a special occasion. The 3 freshwater pearls are mounted on a sterling wire pin and fastened with 2 twists. The chain is a 16" snake chain.


The last pendant was created for a younger lady who has a very unique sense of style. A young a urban-stylish lady. The chain is different this time, it is what is called a "trace" chain. the links make it very flexible, which makes it interesting to attached a weighty pendant! The pendant is made of 5 freshwater pearls stacked up and threaded onto a sterling silver pin.


What did you craft for Christmas?